Nokia Router
Radius Nokia Router – Use daloRadius to authenticate access for 7750SR (SROS)
Th5
Centralized authentication is really important in managing and decentralizing the administration and operation of the network. The radius protocol is the commonly used solution these days. This article, I will introduce how to use daloRadius to authenticate access for router nokia 7750SR (SROS) and/or Configure radius on router nokia 7750 SR with daloRadius
Mục lục
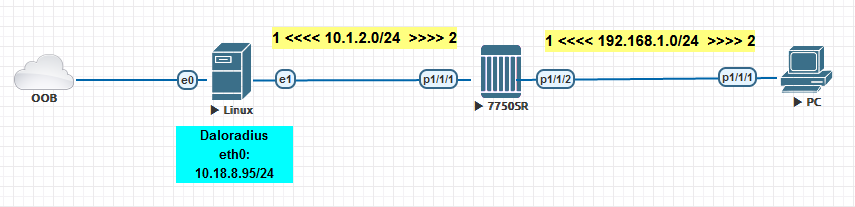
Equipment and connection models
We use the following simple model:
- User in PC want to telnet/ssh to router 7750SR
- Router 7750SR uses radius for authentication and authorization
- Radius server use DaloRadius with ip login 10.18.8.95 (Same subnet with my lab, You can install it according to your lab environment).
You need to install the following tools:
- eve-ng or pnet-lab as background environment.
- daloRadius, 7750SROS, PC
Refer to the article How to emulate Nokia Service Router (TiMOS SROS). All resources you can download at the end of the article.
Configuration on router nokia 7750
I will skip the basic interface configuration. This is the important configuration when setting the radius. To enable radius validation on nokia router we need 2 steps:
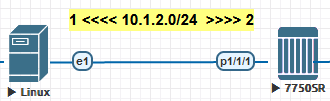
Step 1: Need to define parameters to shake hands with radius server like IP Server and Secret. In this lab, we enable authorization radius server with address 10.1.2.1 and secret test123
/configure system security radius
authorization
server 1 address 10.1.2.1 secret test123
Step 2: Turn on the priority of radius validation to the top, to authenticate through the local router in the second. In case the radius server cannot be verified, you can use the information authentication through the internal router.
/configure system security password authentication-order radius localIn addition, to be able to telnet to the device we need to enable telnet on the router. The default SSH is enabled.
/configure system security telnet-serverWe can set up profiles for each account group such as: Administrator, Operation or only for View. In this lab we will use the default profile. You can create your own for testing.
#Default profile administrator
A:h2ttool.com# configure system security profile "administrative"
A:h2ttool.com>config>system>security>profile# info
----------------------------------------------
                netconf
                    base-op-authorization
                        action
                        cancel-commit
                        close-session
                        commit
                        copy-config
                        create-subscription
                        delete-config
                        discard-changes
                        edit-config
                        get
                        get-config
                        get-data
                        get-schema
                        kill-session
                        lock
                        validate
                    exit
                exit
                entry 10
                    match "configure system security"
                    action permit
                exit
                entry 20
                    match "show system security"
                    action permit
                exit
                entry 30
                    match "tools perform security"
                    action permit
                exit
                entry 40
                    match "tools dump security"
                    action permit
                exit
                entry 50
                    match "admin system security"
                    action permit
                exit
                entry 100
                    match "configure li"
                    action deny
                exit
                entry 110
                    match "show li"
                    action deny
                exit
                entry 111
                    match "clear li"
                    action deny
                exit
                entry 112
                    match "tools dump li"
                    action deny
                exit
----------------------------------------------
A:h2ttool.com>config>system>security>profile#
To check radius is working or not, we use debug and send information to log-id 88.
#Enable log
/configure log
        log-id 88 name "88"
            from debug-trace
            to memory
            no shutdown
        exit

#Enable debug
/debug
    router "Base"
        radius
            packet-type authentication
            detail-level medium
        exit
    exit
exit
Configuration on daloRadius
We start installing daloRadius to shake hands with router 7750. Use Secret is test123
Step 1: Setting Up Network Access Server (NAS) on daloRADIUS
Management >>Nas >> New NAS >> Fill in the required information >> Apply
- NAS IP/Host: IP of router. In this case is 10.1.2.2
- NAS Secret: The same with secret of router for authentication. In this case is test123
- NAS Type: Choose other
- NAS Shortname: Type whatever you want, this for eazy remember.
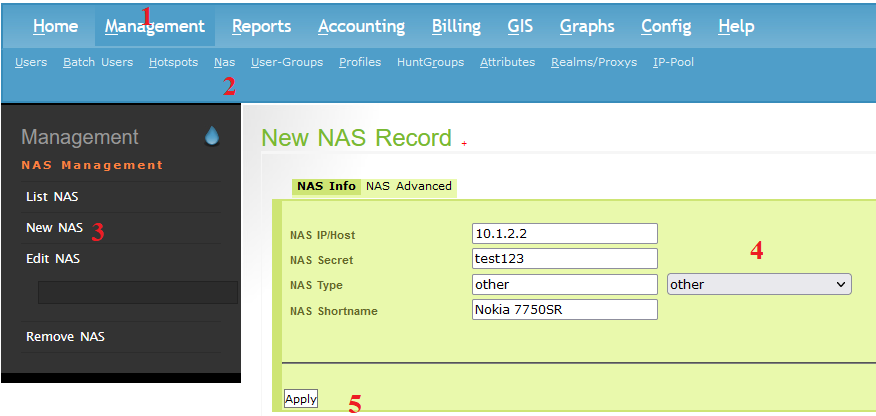
!!! Important Note !!!: After doing this step, you must restart daloRadius Server for this function to work correctly.
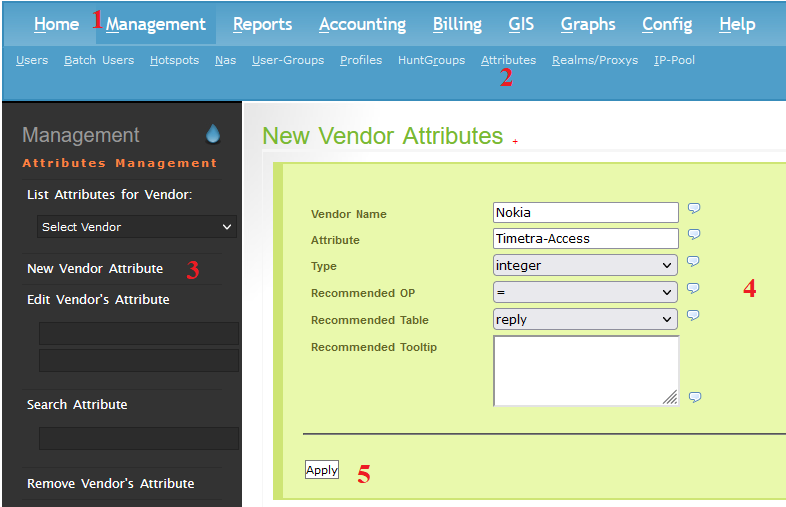
Step 2: Create new attribute on daloRadius
Some attributes of Nokia Router are not common so default will not be available. We need to add it to be able to use it. You can refer to the list of attributes of Nokia SROS in Nokia Document or download it at the end of this article.
In this article, we need to create 3 attributes as follows:
| Attribute Name | Type | Description |
| Timetra-Access | integer | – Specifies the type of access (FTP, console access or both) the user is permitted. – 1=ftp, 2=console (serial port, Telnet and SSH(SCP)), 3=both |
| Timetra-Profile | string | The user profile(s) that the user has access to and refers to pre-configured user-profile-name’s (configure system security profile <user-profile-name>). |
| Timetra-Default-Action | integer | – Specifies the default action (permit-all, deny-all or none) when the user has entered a command and none of the commands-strings in [26-6527-6]Timetra-Cmd resulted in a match condition. – The attribute is mandatory and required even if the [36-6527-6] Timetra-Cmd’s are not used. – 1=permit-all, 2=deny-all, 3=none |
Create 3 new attributes on daloRadius by following step:
Management >>Attributes >> New Vendor Attribute >> Fill in the required information >> Apply
- Vendor Name: Nokia
- Attribute: Attribute Name
- Type: Type
- Recommended OP: =
- Recommended Table: reply
You can check the attributes you have entered in the Search Attribute or List Attributes for Vendor menu.
Step 3: Create new Profiles in daloRadius
Creating profiles for each administrative group is necessary to make it easier to manage. In this article, we create a profile for the administrator to have full control over a router.
Management >> Profiles >> New Profile >> Fill in the required information
- Profile Name: Name of profile, this example is FULL-ADMIN
- Tick to Quick Locate attribute with autocomplete input. Let’s type timetra… and add 3 attributes like bellow picture.
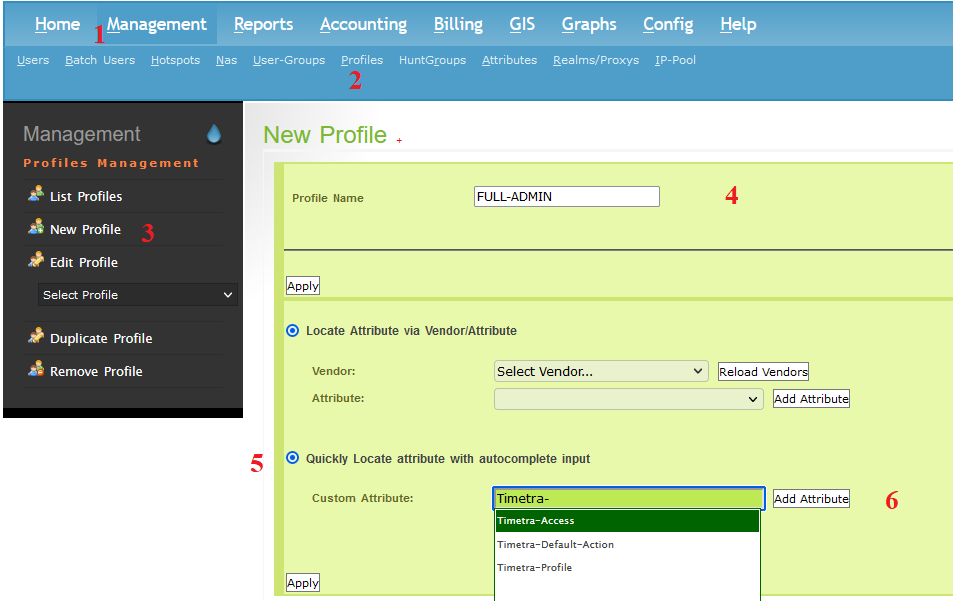
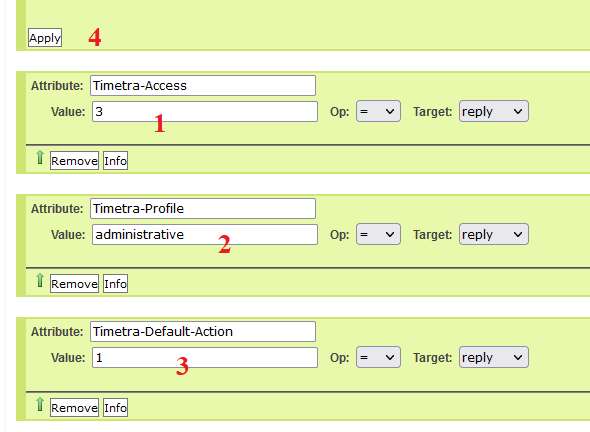
After adding all 3 items (Timetra-Access, Timetra-Default-Action and Timetra-Profile), please scroll down and fill in all the information, then scroll up and click apply.
- Timetra-Access: 3 – Both FTP and Console (SSH,TELNET) allow
- Timetra-Profile: administrator (Profile in /configure system security in router, must have)
- Timetra-Default-Action: 1=permit-all
Once done, you can click on List Profiles to check if it’s done correctly or not.
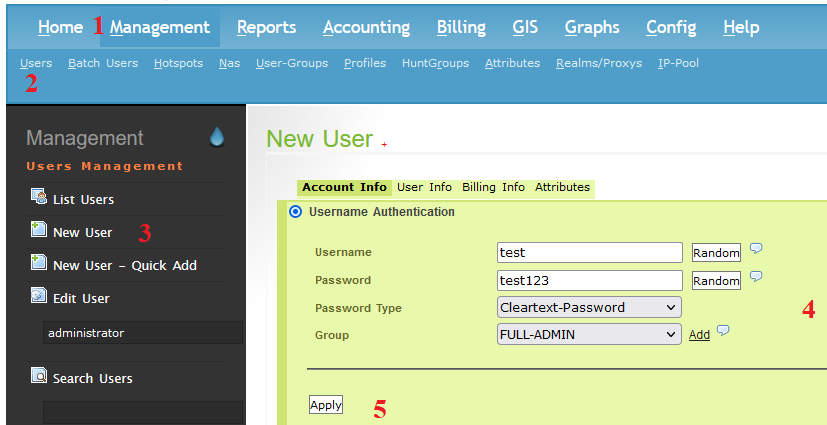
Step 4: Create new Uses for access to router
To create a user account to access the nokia sros router device, follow these steps:
Management >> Users >> New User >> Fill in the required information >> Apply
- Username: test – account to console
- Password: test123 – password to console
- Group: FULL-ADMIN – Profile in step 3
Select List Users to display the accounts that have been created.
Check radius validation
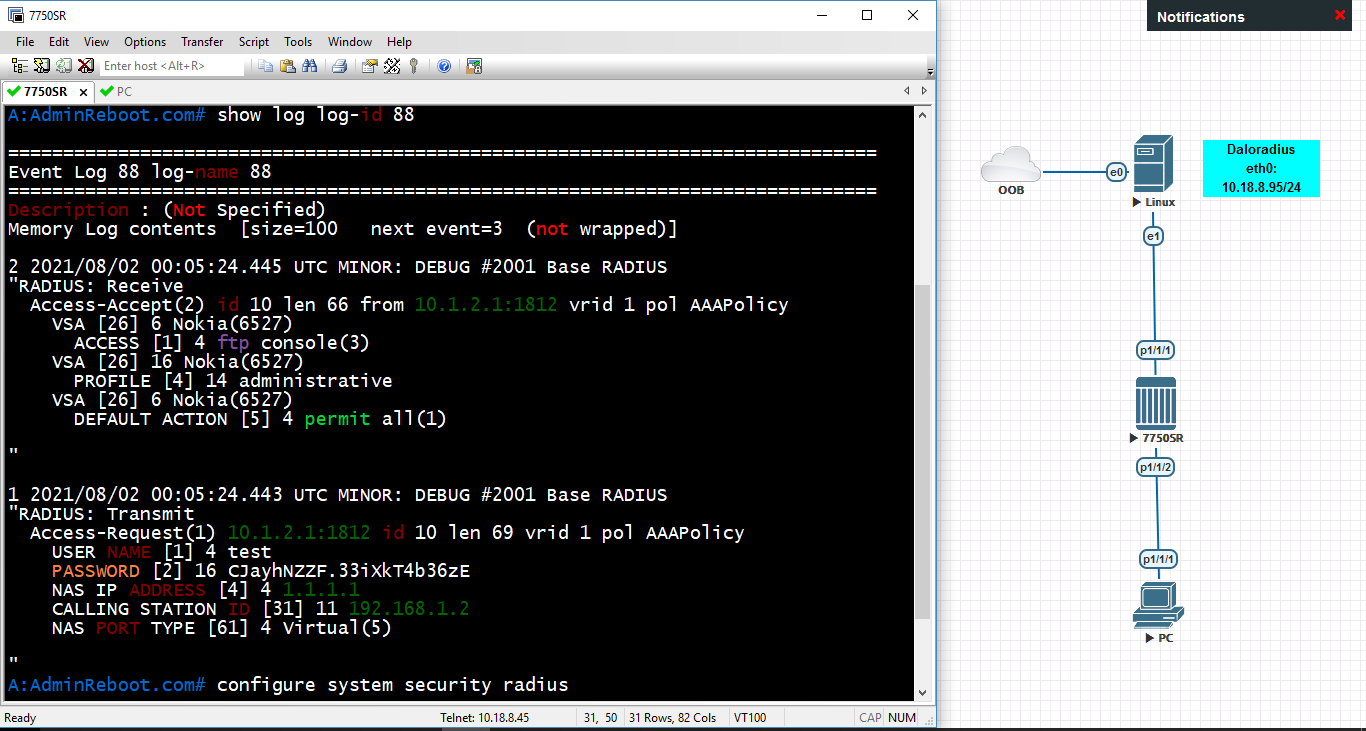
Perform telnet or ssh from PC to 7750SR with username/password: test/test123. Perform operations with the highest privileges such as configuring system security. Checking debug logs like bellow:
A:h2ttool.com# show log log-id 88

===============================================================================
Event Log 88 log-name 88
===============================================================================
Description : (Not Specified)
Memory Log contents  [size=100   next event=5  (not wrapped)]

4 2021/08/02 23:47:35.394 UTC MINOR: DEBUG #2001 Base RADIUS
"RADIUS: Receive
  Access-Accept(2) id 231 len 66 from 10.1.2.1:1812 vrid 1 pol AAAPolicy
    VSA [26] 6 Nokia(6527)
      ACCESS [1] 4 ftp console(3)
    VSA [26] 16 Nokia(6527)
      PROFILE [4] 14 administrative
    VSA [26] 6 Nokia(6527)
      DEFAULT ACTION [5] 4 permit all(1)

"

3 2021/08/02 23:47:35.392 UTC MINOR: DEBUG #2001 Base RADIUS
"RADIUS: Transmit
  Access-Request(1) 10.1.2.1:1812 id 231 len 69 vrid 1 pol AAAPolicy
    USER NAME [1] 4 test
    PASSWORD [2] 16 sMiWwdhUg4rfDCFY808jVk
    NAS IP ADDRESS [4] 4 1.1.1.1
    CALLING STATION ID [31] 11 192.168.1.2
    NAS PORT TYPE [61] 4 Virtual(5)

"
References and Download
You can download resources for practice below:
- DaloRadius qcow2 file for UNL or PNETLAB
- Document: SROS_RADIUS_Attrib_CLI part User Authentication and Authorization
- Document: Virtual Machine – daloRADIUS Administrator Guide
- Configuration and UNL files.
Feel free to ask questions or discuss in the comments section below. Good luck.